Hey there! I'm an embroidery supplier, and I've been in the game for quite a while. One of the most common questions I get from folks who are into embroidery is how to transfer a design onto fabric. It's a crucial step, and getting it right can make all the difference in your embroidery project. So, let's dive into it!
Choosing the Right Design
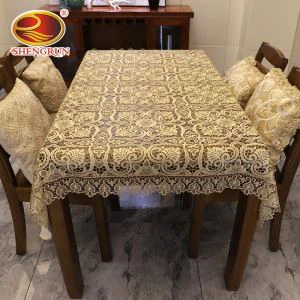
First things first, you gotta pick a design that suits your fabric and the project you're working on. You can find tons of designs online, in embroidery magazines, or even create your own. If you're going for a wedding theme, you might want to check out this Polyester Lace Table Cloth For Wedding Beautiful Velvet Fashion Tablecloth. It's got some really elegant designs that would look amazing when embroidered.
When choosing a design, think about the size. You don't want it to be too big or too small for your fabric. Also, consider the complexity. If you're a beginner, it's best to start with something simple. As you gain more experience, you can move on to more intricate designs.
Selecting the Fabric
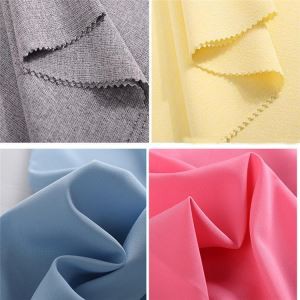
The type of fabric you choose is super important. Different fabrics have different textures and densities, which can affect how the design transfers and how the embroidery looks. For example, cotton is a popular choice because it's easy to work with and holds the embroidery well. Linen is another great option, especially for more rustic or natural-looking projects.


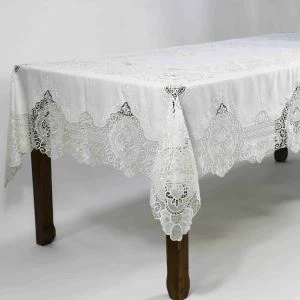
If you're working on table linens, you might want to check out these Antique Lace Placemats - Embroidered Table Linens & Teacup Cushions. They're made from high-quality fabric that's perfect for embroidery. And if you're looking for something more eco-friendly, these Eco-Friendly Polyester Table Mats are a great choice.
Before you start transferring the design, make sure to wash and dry the fabric. This will remove any chemicals or sizing that could affect the transfer process.
Preparing the Design for Transfer
Once you've chosen your design and fabric, it's time to prepare the design for transfer. There are a few different methods you can use, depending on your preference and the tools you have available.
Tracing Method
This is one of the simplest methods. You'll need a lightbox or a sunny window, a piece of tracing paper, and a pencil. Place the design on the lightbox or window, then lay the tracing paper on top of it. Trace the design onto the tracing paper using the pencil.
Next, place the tracing paper, design side down, on the fabric. Use a fabric pencil or a water-soluble marker to trace over the design on the tracing paper. The pressure will transfer the design onto the fabric.
Iron-On Transfer Method
This method is a bit more convenient, especially if you have a lot of designs to transfer. You'll need an iron-on transfer paper, which you can buy at most craft stores. Print the design onto the transfer paper using a laser printer (inkjet printers won't work for this method).
Cut out the design, then place it, printed side down, on the fabric. Cover the transfer paper with a piece of thin cotton cloth to protect the iron and the fabric. Iron the design onto the fabric using a hot, dry iron. Make sure to apply even pressure and iron for the recommended amount of time. Once the design is transferred, let it cool completely before peeling off the transfer paper.
Carbon Paper Method
This method is similar to the tracing method, but instead of using a pencil, you'll use carbon paper. Place the carbon paper, carbon side down, on the fabric, then lay the design on top of it. Use a ballpoint pen or a stylus to trace over the design. The pressure will transfer the carbon onto the fabric, leaving a copy of the design.
Transferring the Design
Now that you've prepared the design for transfer, it's time to actually transfer it onto the fabric. Make sure the fabric is flat and smooth. If you're using the tracing method, hold the tracing paper firmly in place and trace over the design with a fabric pencil or a water-soluble marker. If you're using the iron-on transfer method, follow the instructions on the transfer paper carefully.
Once the design is transferred, double-check it to make sure all the details are clear. If there are any smudges or mistakes, you can use a damp cloth to erase them (if you're using a water-soluble marker).
Embroidery Time!
Now that the design is on the fabric, it's time to start embroidering. Choose the right thread and needle for your project. The thread should match the color and weight of the fabric. The needle should be the right size for the thread and the fabric.
There are many different embroidery stitches you can use, such as the running stitch, the backstitch, and the satin stitch. Start with the basic stitches and practice them on a scrap piece of fabric before you start working on your project.
As you embroider, take your time and be patient. It's easy to make mistakes, but don't worry. Just keep practicing and you'll get better.
Conclusion
Transferring a design onto fabric for embroidery might seem a bit daunting at first, but with the right tools and techniques, it's actually quite easy. Remember to choose the right design and fabric, prepare the design for transfer, and take your time when embroidering.
If you're interested in our embroidery products or have any questions about the embroidery process, feel free to reach out to us. We're always happy to help and look forward to working with you on your next project.
References
- Crafting magazines
- Online embroidery tutorials
- Personal experience as an embroidery supplier